Home › Forums › Public Support Forums › Help And Support › Tumble Dryer Help Forum › Hotpoint CTD40 Belt/Pulley
- This topic has 13 replies, 4 voices, and was last updated 13 years ago by
lanc_red.
-
AuthorPosts
-
March 16, 2013 at 12:29 pm #74598
lanc_red
ParticipantHi all.
Hope someone may be able to help & advise. Our condenser stopped working a week or so ago. When on reverse the dryer started to make grinding noises then gave up spinning at all.
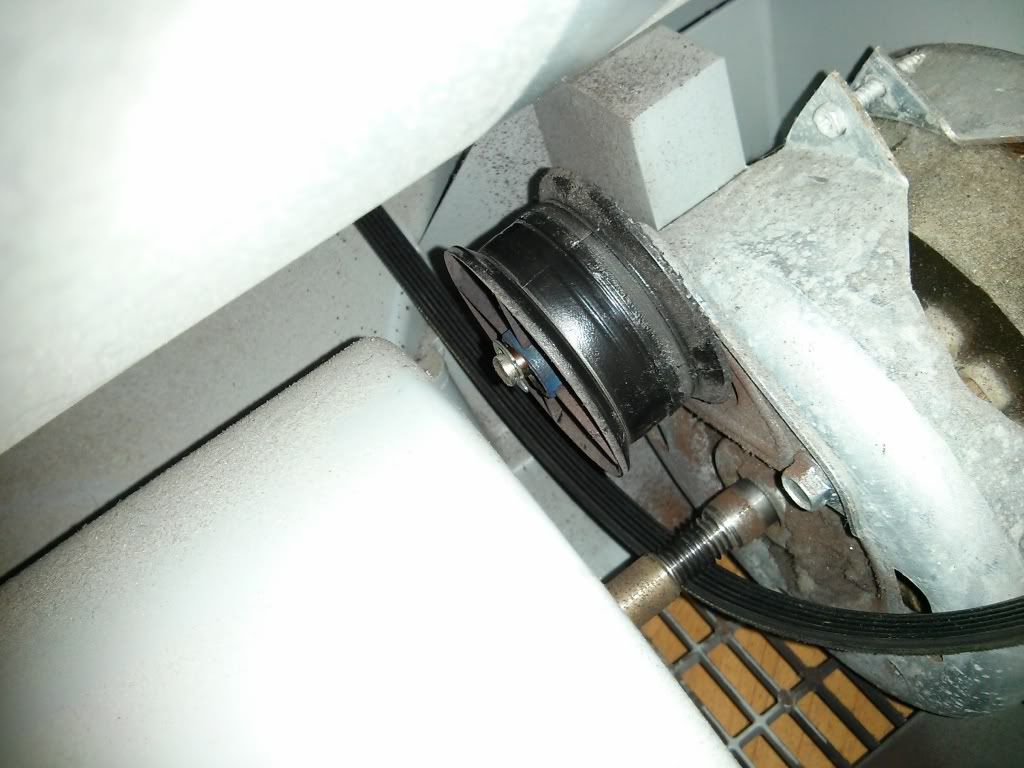
Ive finally managed to get the top off despite nearly breaking my hand as it was soo tight! Side panel removed to check the belt etc and it seems the plastic wheel/pulley attached to the back of the motor is very loose. Im assuming that the belt must go around this but it now doesnt (see pic 01)
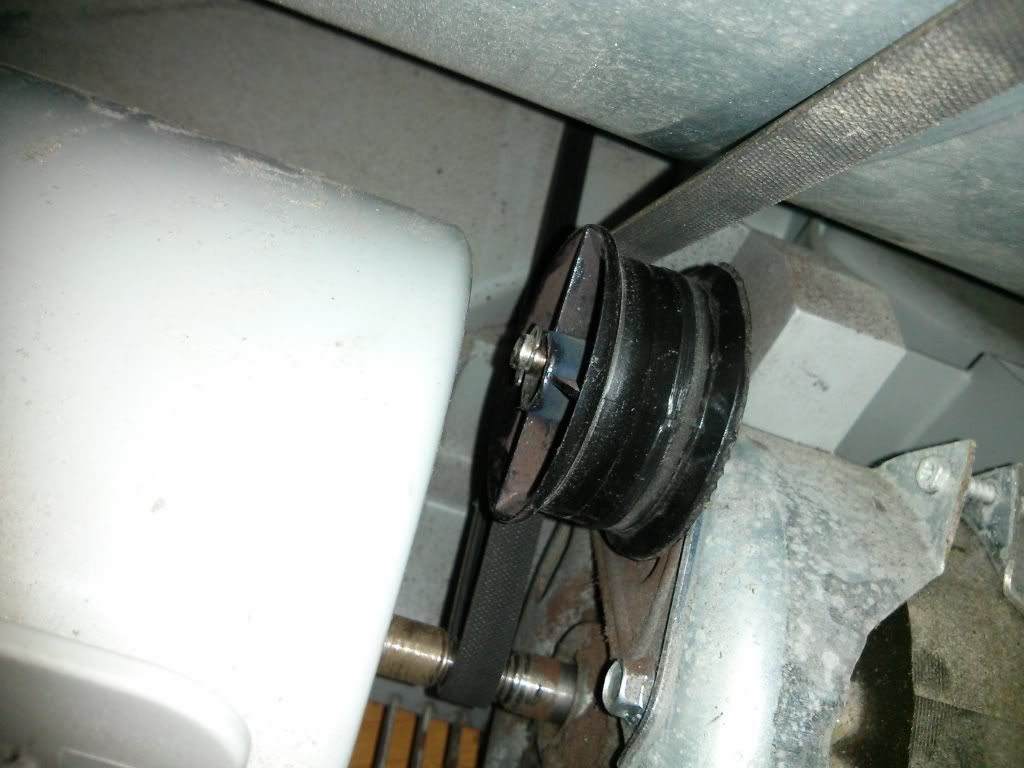
I have managed to get the belt back over the pulley but unsure if its correct. (see pic 02). Could someone advise if this is correct way to re-fit. I havent turned the dryer back on to test as im thinking it will just go again.
Advice appreciated and links to spare part or number would be helpful.
PIC 01
PIC 02
 March 16, 2013 at 12:40 pm #392163
iadom
ModeratorRe: Hotpoint CTD40 Belt/Pulley
That is correct but don’t bother trying to run it, that pulley is totally knackered.
Sent from my iPad using Tapatalk HDMarch 16, 2013 at 12:42 pm #392164March 16, 2013 at 12:44 pm #392165ParticipantRe: Hotpoint CTD40 Belt/Pulley
Thanks iadom (again)!!! Judging from the subtle reply its not going to be easy?
March 16, 2013 at 12:54 pm #392166ModeratorRe: Hotpoint CTD40 Belt/Pulley
Think of it as a challenge. 😀
March 16, 2013 at 12:56 pm #392167ParticipantRe: Hotpoint CTD40 Belt/Pulley
iadom wrote:Think of it as a challenge. 😀
😀 i was thinking it might be easy and without doing a full strip I could get a spanner in there to get it off. Judging from how hard the top was to get off, your probably right!
March 16, 2013 at 12:59 pm #392168ModeratorRe: Hotpoint CTD40 Belt/Pulley
No full strip down, can all be done with the side off, best laid on its side. Prise off the large fan cover and remove the front fan first.
March 16, 2013 at 1:01 pm #392169ParticipantRe: Hotpoint CTD40 Belt/Pulley
iadom wrote:No full strip down, can all be done with the side off, best laid on its side. Prise off the large fan cover and remove the front fan first.
Ahhhh easy!! 😉 Will post up how I get on…..
March 16, 2013 at 1:09 pm #392170madangler1
ParticipantRe: Hotpoint CTD40 Belt/Pulley
Just a note that belt is on the wrong side of the pulley, the belt goes to the motor first at the front, around the motor then the pulley and up to the drum, this way it won’t catch the plastic behind the motor 😉
March 16, 2013 at 1:30 pm #392171ModeratorRe: Hotpoint CTD40 Belt/Pulley
DOH, was looking at the tiny picture on my iPad, didn’t enlarge it. The belt does run on the front of the pulley not the back.
Sent from my iPad using Tapatalk HDMarch 20, 2013 at 10:01 pm #392172ParticipantRe: Hotpoint CTD40 Belt/Pulley
New pulley arrived so I attempted the fix. I can now safely say its fixed, it was a challenge but logically looking back it was easy. Anyway as a gesture, I took pics of my fix and heres a little guide for anyone else should they get stuck. Admins/Mods please add any where that may have made it easier etc.
**** ENSURE THAT THE UNIT IS UNPLUGGED FROM THE MAINS ****
1. Take off the top. Two screws secure the lid at the back. If its never been off before it can be really hard. I had to use a mallet and ‘gently’ tap it off.
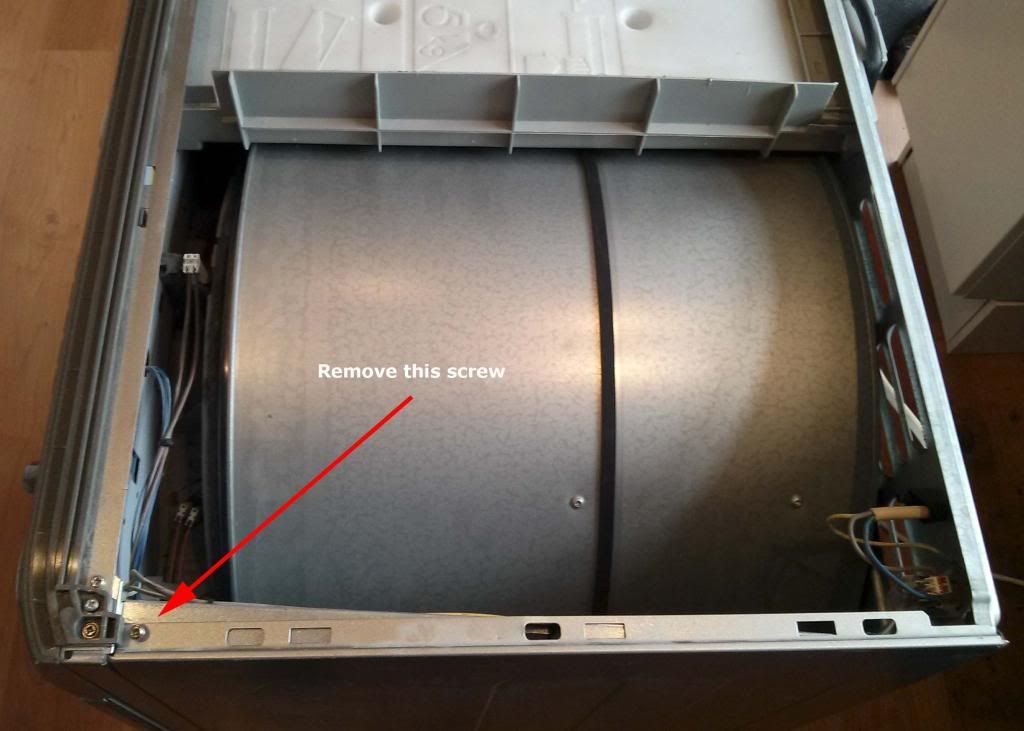
2. Looking at the unit from the front. Remove the right panel. This gives access to the belt etc. Remove the screw at the top as shown
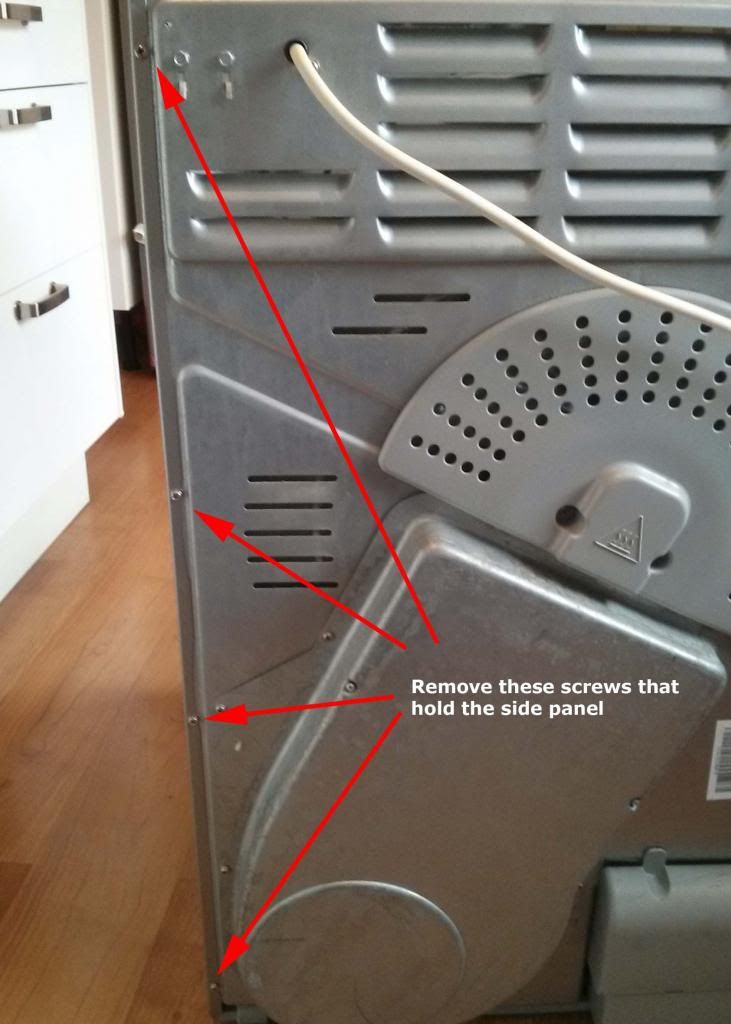
3. From the back of the unit. Remove the four screws on the left. See pic below
4. Now place the unit on its side so you will work from the top.
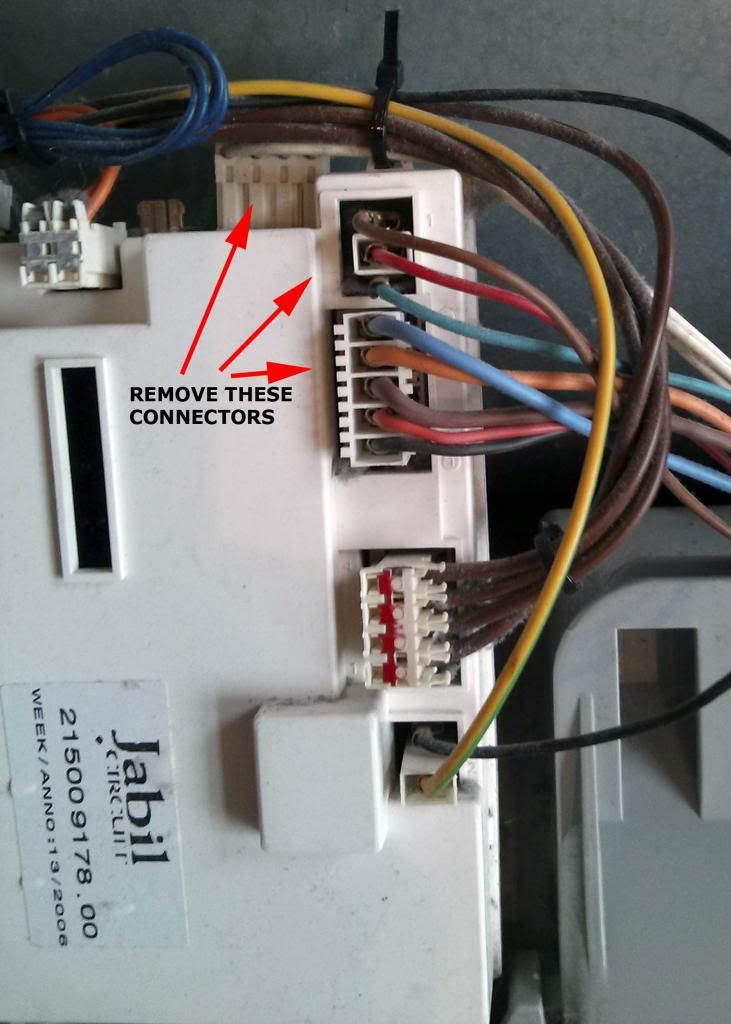
5.You will see the electrics connector board on the left, the fan cover in the middle and belt/motor on the right. First of all take a picture of the wiring. We need to remove some connectors, see pic below. You will also need to cut a couple of cable ties in order to free up the wires. Be VERY careful not to cut the wires! Once all the connectors have been pulled out GENTLY, move the electric board out of the way.
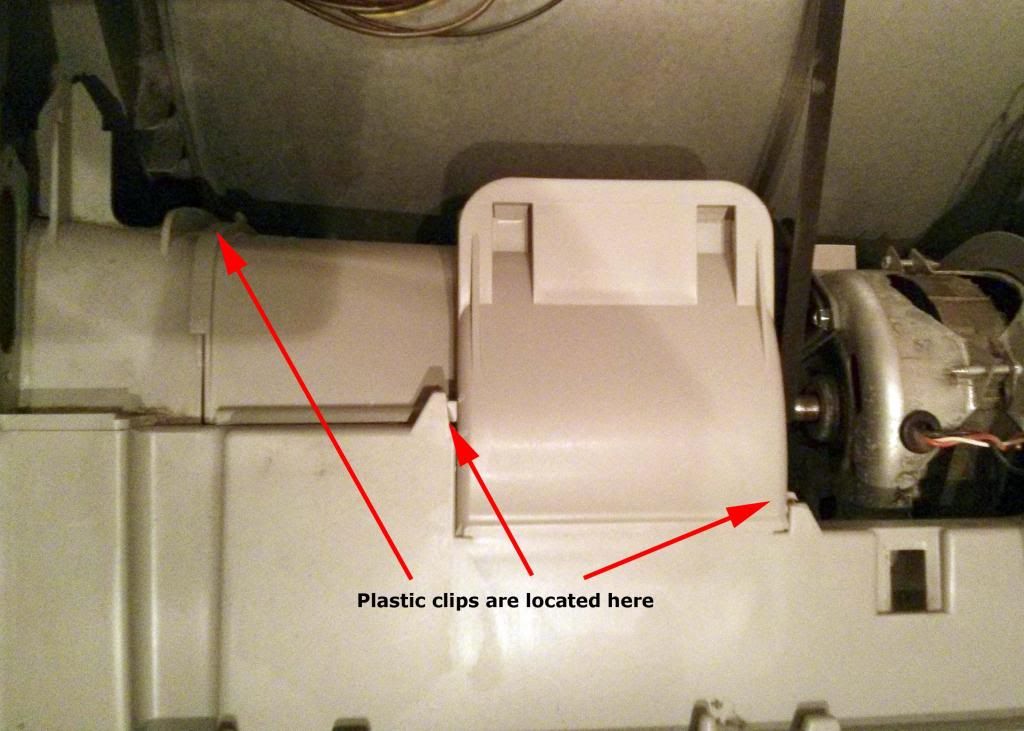
6. We now need to remove the fan cover. This is secured by 3 plastic clips. I prised these off with a flat head screwdriver. Be careful not to snap any like I did!! It will be quite dirty, but can be cleaned later. There is a lager disc that will also come off which slots into the fan cover. Careful this doesn’t slip off & into the machine
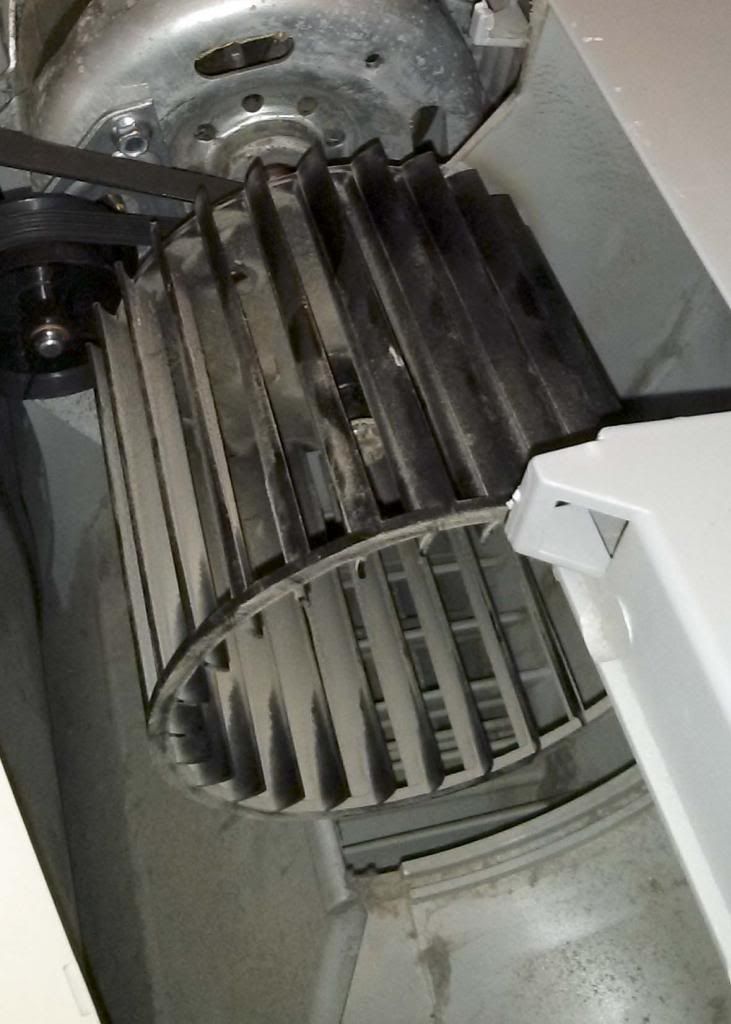
7. You will now see the fan. This needs to come off. There is a clip that holds the fan onto the spindle. Get some pliers and squeeze to take off. Again be very careful not to drop it into the machine. Once off give the fan a wiggle and slide off. Pic shows the fan ON below.
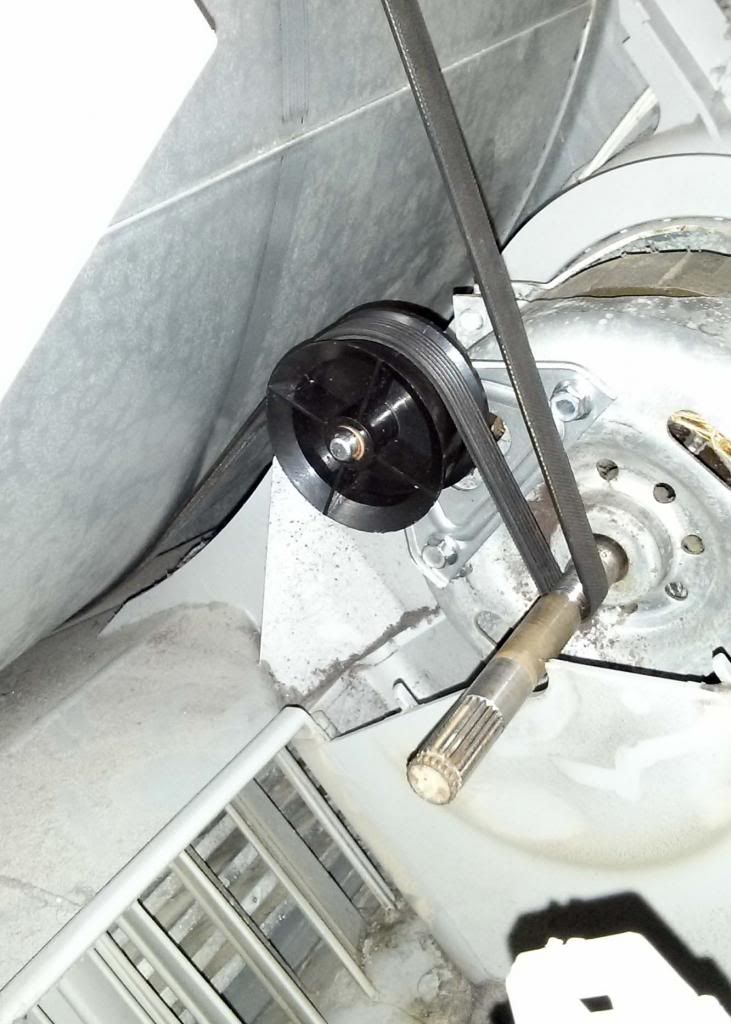
8. Now you should have full access to the pulley. Its secured onto the motor with 2 8mm bolt screws and has a lip that slots into the motor. In whatever way you can get this off!! I used a socket wrench which allowed to work in the tight space. Its a good time to check the belt aswell for any wear.

9. Now to fit the new pulley. This is the hard, but is logically easy if you can just get it right. Slightly screw in the bottom bolt on the pulley. Enough so it wont come out. There is a lot of tension here. Now get the lip to go into the hole on the motor. It does eventually and slots in and stays tight nicely. It may take a few goes (20 mins worth!!) but it does go in and stay in. You may need to loosen the bolt. Once in fasten the other bolt in. The belt goes around the front of the pulley as shown in the pic below (pic is looking at it from the side). Once your happy, tighten the bolts.
10. Give the drum a spin to check it doesn’t catch anything and that the belt is on the correct part of the spindle. Its got grooves which allow the belt to sit in.
11. Now working from back to front put everything back.
– Fan on, the clip to secure
– Fan cover and make sure it clips in
– Electronic board, screws back in
– Re-connect all the electrical connectors in the correct place. Make sure they are FULLY inserted
– Cable tie the wires so that they don’t rub against the drum
– Side panel back on
– Lid back on
– Give it a go!!Whilst do all of this its a good idea to have a hoover handy as its very dusty & to give the inside a good clean as much as you can. It can also get quite wet if it was recently used. Make sure you have a towel handy.
August 16, 2013 at 12:45 am #392173devilman9050
ParticipantRe: Hotpoint CTD40 Belt/Pulley
Hi Lanc_Red (or anyone else who knows the answer!)
I’ve got the same pulley etc on my IS70c, this might sound like a dumb question, but the pulley wheel doesn’t look like it has worn away or collapsed, so should pulley run evenly or should it move around a bit on the side closest to the motor?
My belt snapped and i’ve been trying to fit the new one but it jumps off the pulley after a few spins….
Great walkthrough too, I followed one on a blog and it completely missed the ball-ache with the pulley!
Thanks,
Dez
August 16, 2013 at 8:11 am #392174ModeratorRe: Hotpoint CTD40 Belt/Pulley
The drum pulley should not have any play in it at all.
As I mentioned in one of my earlier posts, this pulley can be changed by simply removing the lid and side panel. No need to remove any wiring.
The two screws to the front end of pcb can be removed to allow it to be moved to the side, just leave the wires attached. 😉
August 17, 2013 at 7:04 am #392175ParticipantRe: Hotpoint CTD40 Belt/Pulley
Thanks Iadom, have ordered a new one 🙂
-
AuthorPosts
- You must be logged in to reply to this topic.